レーザーおよびスキャンヘッドサブシステムのキャリブレーション精度
Authors: Charlotte Solak, Mathew Tedford, Malte Hemmerich
要約
While parameters such as resolution, repeatability, temperature stability, and long-term drift are well-defined in specification documentation for scanning heads, calibration accuracy often receives less attention. This parameter plays a pivotal role in understanding and managing errors at specific scanning field positions, yet it remains highly dependent on factors like the optical system (e.g., F-Theta Optics) and machine setup (e.g., material flatness, slope). As a result, calibration accuracy can only be fully determined and fine-tuned during the final machine setup and cannot be pre-determined by the manufacturer. This paper delves into several calibration strategies, explaining their complexities and levels of accuracy. We specifically examine these strategies in the context of both hybrid and fully digital 2-axis scanning heads, providing valuable insights into their impact on laser system performance. Through this exploration, we aim to enhance the understanding and implementation of calibration accuracy as a crucial factor in achieving precise and reliable results in laser applications.
Introduction
In the realm of industrial applications, the importance of scan field calibration varies depending on the specific task at hand. When tasks involve repetitive processes, such as marking, cutting, or engraving at fixed positions, the primary concerns revolve around parameters such as repeatability and drift. In such scenarios, any deviations in geometric dimensions or positioning can be solved by adjusting the job profile, rendering calibration a less prominent consideration. However, the scenario undergoes a paradigm shift when we delve into applications characterized by dynamic and shifting positions. Tasks such as Mark-on-the-Fly (MOTF) or camera-based positioning require precision from the start, leaving no room for post-process adjustments. In these contexts, achieving precise calibration accuracy becomes crucial for the successful completion of tasks.
Different applications require different levels of calibration accuracy. Marking and Coding applications using a CO2 laser and a 2-axis hybrid scanning head can often successfully use the factory pre-settings for a given scanner and lens combination. The large focal spot size and the limited positioning requirement of these applications often permit this. On the other hand, applications within the e-mobility or semi-conductor industry usually have tighter positioning requirements and often use On-The-Fly or camera-based positioning operation. Here a pre-defined calibration table will not be sufficient as there are non-linear imperfections added by the individual optical system. Consequently, a comprehensive calibration process during machine setup becomes indispensable, ranging from rudimentary hand calibration to rigorous metrology-driven methods. Scan heads have two main sources of optical distortion within the focal plane. Due to the separation of the X and Y mirrors within the scan head, the optical distance to the target position in the scanning field varies, causing a pincushion distortion. Consecutively, the F-Theta lens is adding a barrel distortion in such a way that the resulting shape is not a perfect square or a rectangle, but a non-linearly distorted shape.
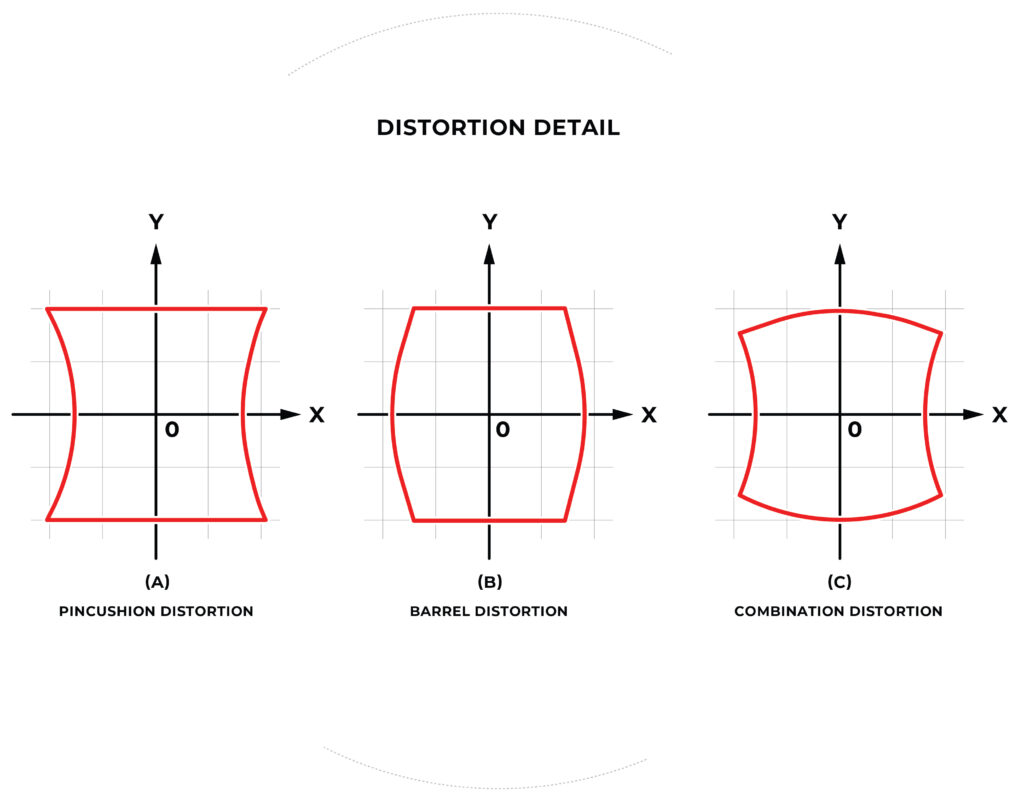
In the following segments we explain the prerequisites, procedures, and results for two-axis calibrations of a combination of scan heads (Versia and Lighting II), calibration methods (hand calibration, flatbed scanner method, and metrology method), and substrates (glass and marking paper) to achieve various levels of calibration accuracy. For best comparability we use the same fixture, laser, and lens for both scanning head types.
Methods and Materials for Calibration Accuracy
In this study, we compare the calibration results of two 14mm 2-axis scanning heads. To ensure the highest level of comparability, we employ identical equipment throughout the calibration process, including a 20W Fiber-Laser, mechanical mounting, and an F-Theta Lens.
The first scanning head is Novanta’s VERSIA —a hybrid 2-axis scan head that combines digital drivers with analog galvanometers. VERSIA offers flexibility, allowing operation with either a 16-bit resolution via the XY2-100 protocol or a 20-bit NVL-100 communication model. For the purposes of this study, we employ the NVL-100 protocol. The second scanning head in our analysis is Novanta’s Lightning II, configured as a full digital 2-axis system with a 14mm free aperture. Distinguished by its closed-state space feedback mechanism and a 24-bit bi-directional GSBus communication protocol, Lightning II promises enhanced accuracy performance.
Regarding the calibration methods, our study aims to compare three distinct levels of sophistication. These include an entry-level hand calibration, which is a swift and equipment-light procedure, a mid-range calibration employing a flat-bed scanner to assist in the process, and a high-end calibration utilizing a metrology station. In all three levels we use black marking paper and glass substrates to show the influence of the marking material on the calibration result. The overall process between the three methods is quite similar. The scanning head is used to generate a pattern of perpendicular lines on the marking substrate. The distances of the intersection points of the pattern is then measured and fed back into the controller calibration software, CalWizard. This process is repeated until no further improvement can be seen between two iteration steps. Those who are interested in a step by step procedure and more specifics on how to use the Software, should visit the CalWizard Manual.
Equipment used:
- Laser – 20W IPG (Part # YLP-V2-1-100-20-20)
- F-Theta – F-160 Jenoptik (Part # 01770-019-26)
- CalWizard Software – V2.1.9
- Flatbed Scanner – Cannon 9000 FMark 2
- Flatbed Calibration Artifact – D09676-2
- Metrology – MicroVU (Part # 1052UC)
- Scan Head A - Lightning II L2H14X2-GSBW-YH-A150
- Scan Head B - VERSIA-14 VS14XY2BA-LC01-V02
- 5 inch paper targets
- 5 inch Aluminized glass targets
Hand Calibration Method
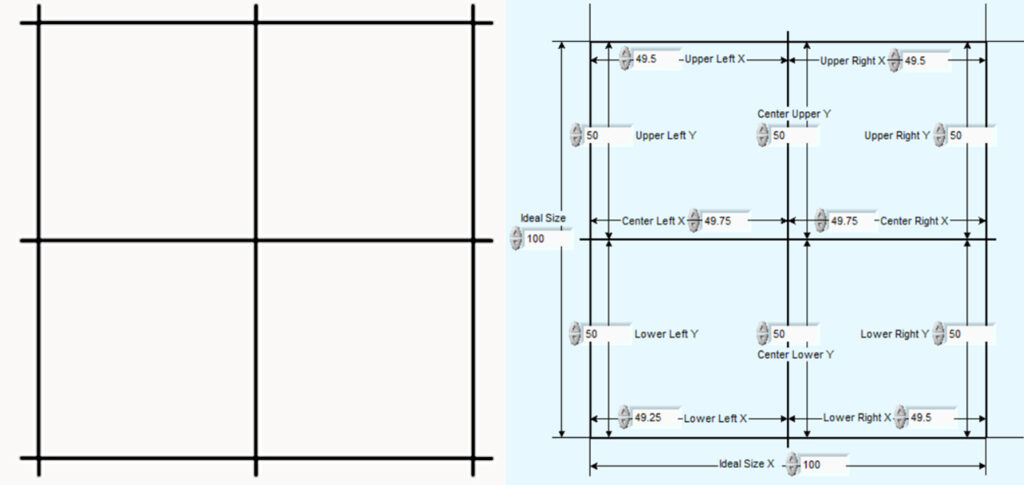
Hand calibration represents the fastest and cheapest way to perform a calibration. At the same time the method is the least accurate of the available calibration methods due to the coarseness of the measuring tool and the low number of points that can be comfortably handled to build the calibration table. Usually, a 3x3 up to a 5x5 grid of horizontal and vertical lines is marked on the material. The distances between each cross-position are then measured by hand using a ruler or caliper and fed back into the CalWizard Software. The process is then repeated until the error starts reversing. This typically takes about three iterations and can be done in a considerably short time and without significant investment in equipment. For hand calibration an acceptable amount of error is 1% of the scan field.
Flatbed Scanner Method
To improve the overall calibration quality, it is essential to remove the human induced limitations of the hand calibration. Therefore, a flatbed scanner is being used that both raises the number of cross-positions that can be measured per iteration and also reduces the human factor when it comes to measuring the distances. As commonly available flatbed scanners are not calibrated and are intended to output a scanned image, Novanta has created a procedure to circumvent both flaws. A LabView-based Software Tool within CalWizard is used in combination with a calibration artifact to calibrate the flatbed scanner after it is turned on. The calibration artifact is a set of box cross points that Novanta designed specifically for this task.
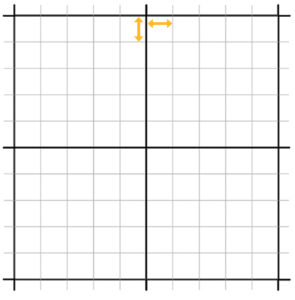
After that the galvo scanner is used to generate a matrix of 11x11 perpendicular lines (see Figure 3). The flatbed scanner then measures the distances between each cross-position and directly feeds its results into CalWizard. This process is repeated until the error starts to reverse. Typically, this takes around 6-7 iterations which takes about 1 hour of time and the whole process can be implemented with the investment of several hundred dollars. For the flatbed scanner an acceptable amount of error is 0.1% of the scan field, but in many cases better results can be achieved.
Metrology Method
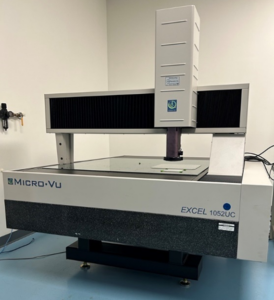
The high-end method for calibration goes hand in hand with high end position measurement. The Metrology method in general has the highest level of accuracy due to the precision of the measurement tool the MicroVu and the high number of points building the calibration table. Although the predicted accuracy is based on the metrology machine being used. This is unlike the other two methods whose predicted error can be calculated with a percentage of the scan field. Similar to the method using a flatbed scanner, eleven evenly spaced horizontal and vertical lines are laid out in a grid pattern. The MicroVu measures the distance between the lines and the data is then manually imputed back into CalWizard.
This process is repeated until the error starts to reverse which again takes around 6-7 iterations. Each iteration can take around 20 minutes to measure. While this is the most accurate method of calibration it also takes the most amount of time and requires the highest equipment investment.
Results
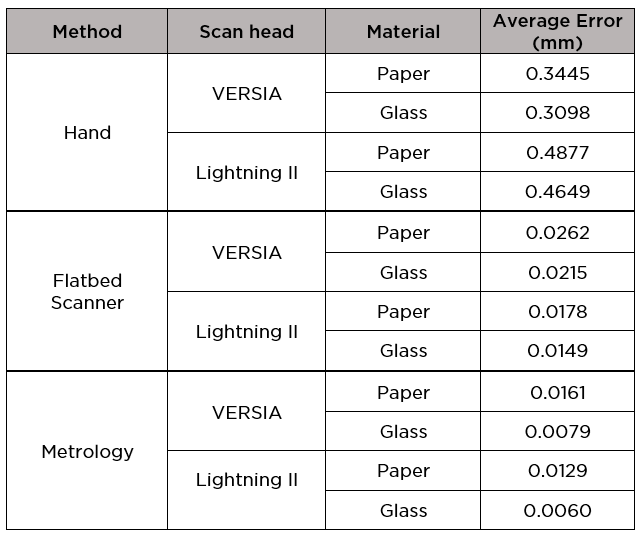
To measure the performance of each of the methods, a Lightning II and VERSIA were calibrated using the three aforementioned methods on both paper and glass. At the end of the calibration steps, a 10x10 grid pattern with overall dimensions of 100mm x 100mm was marked on both substrates and analyzed by a metrology station.
Figure 5 shows the glass substrate was typically better than the paper substrate, and Lightning II was better than VERSIA. The exception to this being hand calibration where Versia produced better results, as expected. The calibration error due to human measurement and the level of accuracy of a ruler, outweigh the performance of the scan heads for this calibration method. Additionally, the glass substrate tends to be more repeatable and maintains its flatness when going between the marking fixture and the metrology machine. Whereas paper will tend to vary more between the marking and measuring fixtures which can introduce errors. Due to this, results recorded from paper trials may not follow the expected trend of results. For example, figure 5 shows the Versia metrology method produced better results than the Lighting II paper method, while the opposite is true for glass. The introduced error from paper being a nonrigid non flat substrate could be the cause of this deviation and not caused by the performance of the scan head. Figure 6 shows there is an inverse relationship between the level of calibration and the amount of time spent on the calibration as well as cost. Factors such as measurement accuracy, substrate material, cost, and time should all be analyzed when selecting the correct calibration method for a given application.
Summary
The results for our calibration tests showed expectable results with the full digital Lightning II scanning head allowing better calibration as the hybrid Versia scanning head and with the higher sophisticated methods showing better calibration results than the lower sophisticated ones. However, the results also put the differences between the scanning heads and calibration methods into perspective towards the temporal and financial investments of the calibration and it also allows a better understanding of what level of calibration is overall achievable.

It became apparent that the inaccuracies of the hand calibration method outweigh the advantages of a rigid glass material or a fully digital scanning head. It also became apparent that for highest accuracies in most sophisticated calibration methods, the rigidness of the marking material also plays a role. Depending on the Application Requirements, all tested calibration techniques still do have use cases.
Machine builders for high-speed bottling or marking and coding applications will typically have a focus on speed over accuracy, as long as the marked information is human/machine readable. A quick and cheap hand calibration that delivers an accuracy of around 0.5mm is likely very acceptable in these applications and thus there is no need to go any further than calibrating with paper and a ruler or caliper.
Flatbed scanner assisted calibration is likely a good fit for converting applications that include marking, perforating, or cutting of materials on a roll-to-roll or conveyor belt machine. These applications typically use a CO2 laser at a longer working distance, which produces a large spot size. During this process, the laser beam only runs one pass on a designated section of material. This requires high speed, moderate accuracy based on the large spot size and low repeatability. Based on these requirements a converting application could use a Lighting II or Versia scan head calibrated with a flatbed scanner.
An example for an application that requires a high-end metrology station calibration is via-hole drilling of circuit boards. Here a camera-based positioning system is used to identify the position of the circuit board and hundreds of drill positions over the entire scanning field must be matched with best possible accuracy. Tight spot size requirements and drilling techniques that include multiple point and shoot steps per hole further speak to calibration as well as repeatability and drift. Thus, for this application high calibration and low drift from the scan head is mandatory so that a Lighting II scan head calibrated with a metrology machine is a likely option to get the job done.
Novanta ベネフィッツ
Novanta is uniquely positioned to solve even the most complex challenges for OEMs, system integrators, and end-use customers seeking to advance their manufacturing processes with high precision laser systems. With some of the most well-known brands in the industry and in-country application and service support, Novanta delivers reliable, precise, and durable components and sub-systems.
Our Applications Testing Labs offer application and proof-of-concept testing to OEMs, system integrators, material manufacturers, processors, and end-users of automated machinery. Novanta Application Engineers are laser processing experts, and understand the parameters that will ensure successful, efficient laser processing. Using laser and beam steering equipment from well-known Novanta brands, our Application Engineers will determine the key product parameters and processing know-how to achieve the desired results.


